
Monday, July 30, 2012
Cropping Fun
My friends and I went to our local scrapbooking store for their "Farewell to Summer" crop over the weekend. I may not have got much done, but I did have loads of fun with my friends! We always laugh more than we work.
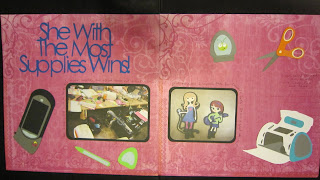 We also tend to 'spread out' quite a lot and we always bring waaayyyy more supplies than we could ever need! That's why I scrapbooked a photo of my work station at the crop. My journaling reads:
"Yes, I really did need to bring all those supplies, and spread them out t--h--a--t--f--a--r... just to make 2 layered cuts for Chrissy. It was a great crop, tho!!"
Scrapbooking with my friends is one of my favortie things :)
All my cuts are from the Cricut Everyday cartridge.
We also tend to 'spread out' quite a lot and we always bring waaayyyy more supplies than we could ever need! That's why I scrapbooked a photo of my work station at the crop. My journaling reads:
"Yes, I really did need to bring all those supplies, and spread them out t--h--a--t--f--a--r... just to make 2 layered cuts for Chrissy. It was a great crop, tho!!"
Scrapbooking with my friends is one of my favortie things :)
All my cuts are from the Cricut Everyday cartridge.
Wednesday, February 29, 2012
A birthday surprise!

Friday, August 26, 2011
Circle Blog entry for August
This month our challenge was to create a scene using Cricut cuts. I did a double page 12X12 layout of my husband and me enjoying a day at the beach on Galveston Island in Texas.

I had a lot of fun doing this challenge. My photos are not of good quality because we just used a throw away camera. Making the scene helped make my photos look a LOT better than just matting them on the paper.
The cartridges I used were Pop Up Neighborhood, Create a Critter, Life's a Beach, & H20. Plus, I finally remembered to Cuttlebug my clouds before I stuck them on my layout! (D'vine Swirls) I l-o-v-e the little plane, too!

Wednesday, August 3, 2011
Cricut Circle's weekly contest #37
This time our challenge is as follows: "All week long the Cricut Circle Design Team has been showing you new and different techniques to use with your Cricut Cuts (check back tomorrow, there is still one more!). . . now it’s your turn! Create a project of your choice (Scrapbook page, mini album, card, home decor . . . it’s up to you!) including one of the techniques we have showcased this week. Let me recap for you! Monday, Kristen used letter stickers to create her own textured patterned paper of sorts to cut shapes from. Tuesday, Suzanne cut her shapes from vellum and used her Cuttlebug machine to emboss them. On Thursday, Jennifer used beads and glitter to dress up her Cricut cuts to create a Keepsake Photo Thank You card. Today, Deanna shows you a crayon resist technique with spray mists. Finally, tomorrow Michele Kovack will be back to show you how to add shading and dimension to your Cricut cuts using Copic markers! Choose one of these techniques and then apply it to your own project! We can’t wait to see what you do!"
I did a layout of myself when I received my A. S. from Boise State. I have spent the last 10 years thinking it didn't count for much, since its not a bachelor's degree, but, no more! I'm going to celebrate it because I worked hard for it. {I was born an English major - I used to get library passes in high school on dissection days, which does not usually lead to Science degrees ;) }

I chose to use glitter and beads to enhance my project. I used black Stickles on the black cuts of my flowers to give them a little life. I centered each one with tiny glass beads, turned on their sides, to mirror the black dots in the ribbon. Usually, I try to hide the holes in the beads, but I like this effect, too. I also used glass beads shaped like leaves as accents to the flowers. They are clear and don't show up very well so I dabbed green Stayz On ink on their backs.

I used the Mother's Day Bouquet cartridge, which I love, for all the flowers, and Lyrical Letters for the font. I tried to plan out the exact flowers to use but, in the end, I just followed the advice from the cartridge's packaging and layered my favorite shapes together to create my flowers. Good advice. I do have to say, though, that I hate that I dropped the big flower on the left down too high up on the page - it makes the pages unbalanced :( but that's kind of my thing ("Everything would be perfect except for that one thing!")
Friday, July 29, 2011
Cricut Circle's July monthly challenge entry
First, a personal note: Pam and Dawn, don't read this post yet or you'll spoil your surprise! Stop it right now.
This month's challenge is titled "Let's Eat!"
I'm going to a pajama crop tomorrow with my besties and I'm going to surprise them with the BEST THING I HAVE EVER EATEN - pig candy. I found out about this treat of treats from a series of books written by HRH Jill Conner Browne (http://sweetpotatoqueens.com).
The challenge requirements are: Create a project of your choice with a BBQ, Picnic, or Patio theme AND use a gingham or check pattern somewhere on your projects. Your project must include atleast 2 different Cricut Image Cuts.
I made labels for individual bags. My cuts were made from these cartridges: Mickey and Friends Font, Elegant Edges for the white base, Animal Kingdom (piggy face), and Everyday Paper Dolls (piggy's bib is a bandana.)
I know technically we're not eating this outside but it is h-o-t here. 100+ degrees hot. I would hate for us to melt before we get to eat our pig candy! So we're going to have an indoor picnic like smart girls.
Now that this project is done I have to go sew the sequins on our capes :)

Sunday, July 10, 2011
My First Place Win
I am very proud to say that I won the June Sketch Contest at my local scrapbooking store!! The usual end to the contest fell during the July 4th rush and I didn't hear from them so, I assumed for the longest time that I had lost but, to my happy surprise, they had just not contacted the winners yet. Here's my entry:

I worked off of this sketch:
http://www.facebook.com/photo.php?fbid=10150198295004523&set=a.212634019522.128306.134485994522&type=1&theater
I used the Cricut Old West and Yee Haw cartridges (that I got FOR FREE at the Texas Stampede - gotta love that!) I spent more time layering the cowgirl images from the Yee Haw cartridge than I wanted to but I really wanted a specific look to them. It meant cutting the layers several times and then cutting them up & using bits of each to create the right look.


My favorite part of this layout is the matching bling I added to the hat in my daughter's shadow in this photo. I also really like the colors of the photos. I used an editing effect in iPhoto on my Mac called, 'Antique,' to make them look more vintage, which muted the reds and softened the-too bright sunlight.

I used my trusty iRock for the bling and even used it on some iron-on bling intended for use on clothes. I used silver metal squares as nail studs on the wagon wheel. They're about 1/4 inch tall so they took a few extra seconds for the iRock to heat up the glue but it worked! You can see one in the upper left of the above photo. I can't remember what brand they are; they're meant to be ironed onto jeans. I got them on clearance at JoAnn's last year. The only caution I have is to not press down hard, (I flattened a few studs,) but just let the iRock do its job. I'm going to pull a few other types out of my stash and try them out on scrap paper. Nice to have an avenue for a wider variety of bling and not be stuck with just round ones found in the scrapbooking aisle.
Friday, June 24, 2011
June Cricut Circle Monthly Challenge entry
This month I actually made 2 projects for the Circle's "On the Road Again!" challenge. The first one I am very proud of (not to take anything away from the second project - but more on that later.) It's a 'break the ice' book for my daughter to take to Girl Scout horse camp on Sunday.
I really wanted her to have something that would give her a way to start conversations and share a little bit about herself with her cabin mates. She's seen it, and complimented me on it ;) , but I'm not letting her fill it out until the car ride to camp. She tends to be 'over it already,' so to speak, if I have a 2 part project for her and start the first part too soon. Not in a negative way, of course, she just feels done with it and has already found something new to be excited about. Basically, I've learned to time certain things right.
Anyway, this is the first project:


I used the Yee-Haw Lite cartridge and the Old West cartridge for the main theme of this file folder book since its for a horse riding camp. I was very lucky to find a shape that said "Saddle Up" on the Old West cartridge for my front page since that's the name of the camp she's going to attend! (She's using this shape to make SWAPS for swapping, too.)
I created a personal journaling space on the back. On the inside, I created four tags that insert into the pockets. I asked my daughter to come up with 4 questions she would like to ask her bunk mates in order to get to know them better. She decided on #1 Where are you from? (I cut out shapes from the 50 States cartridge of the states she has lived in), #2 Have you ever been to horse camp before? (Old West cartridge,) #3 Do you have any pets? (shapes of animals from Everyday Paper Dolls), and #4 What are your favorite hobbies? (shapes from Old West and Everyday Paper Dolls.)
I used chipboard in the tags because I wanted a firm writing surface. My daughter is going to fill out her answers on them on the car ride to camp and then ask the others girls to do so at camp. This way, they see what she had to say about herself as well.
My favorite thing about this book is that I adhered to part of the Girl Scout Law when I made it. Part of the Law says to "use resources wisely," and I applied that to my project. I made this book out of my scrap stash. I used 1 extra piece of new white cardstock to complete the tags (they are reversible) because I ran out of white in my stash, but everything else, from the shapes to the twine wrapped around it, are from leftover pieces of other projects. The file folder is made up of recycled paper, too, so it fits right in.
Now that I have finished tooting my own horn, I'll show my second project that actually made it into the Circle challenge. This project came about from a conversation with a fellow Circlet that felt entries to challenges should follow the guidelines more strictly than my first project may have done.
While I felt comfortable with what I designed as fitting the challenge of, "Create a project of your choice that will help you or your kids on that long summer road trip. It can be a travel game, travel activity, organizer, snack holder, whatever!," the introductory paragraph to the project said specifically to gear your project toward use in your car. (It says, "For a lot of us summertime means ROAD TRIP! For this challenge, we want you to create something . . . ANYTHING for your car! It can be a travel game, travel activity, organizer, whatever! Let your imagination run wild.")
For her, the part about creating something specifically for your car was important, as in not something that you can (and probably would usually,) do someplace else. She felt that maybe projects like my Camp Saddle Up book were pushing the limits a tiny bit, I think because projects like mine were meant to have the bulk of them used somewhere else besides n the car. Now, again, I feel my project would have worked because I thought all of it up after reading the challenge and am still going to have my daughter fill it out on the way to camp (plus, read the other girls entries to me on the way home,) but I see her point. And I am very glad she talked with me and planted the seed in my head because otherwise I might not have made this:


A little purse for my Gypsy's car charging cord. Totally stinkin' cute, right? I used a purse shape from Tags, Bags, Boxes and More (cut at a height of 7 inches from my Gypsy,) and a Gypsy emblem from Cricut Everyday. Much simpler that my file folder book but I love it! This way I can grab the right cord instead of fishing through the mangled pile that we usually have on road trips. Now my daughter has something to make her road trip go a little better and, I have something for mine.
So, thank you, fellow Circlet, for pushing me to try harder :)
Subscribe to:
Posts (Atom)